Labels

ADLs all four position alphabet letters alphabet writing arts & crafts Attention auditory learner auditory processing beads bilateral motor coordination skills blocks brain bunny story categorization cognitive skills color color dots coloring colors crossing a midline cutting CVC words deep breathing directionality disclaimer dynamic communication Expectations eye-hand coordination Figure 8 fine motor activity fine motor skills first grade folding paper following directions fun Fun game gross motor activity handwriting Handwriting Without Tears hemispheres communicate Home Exercises Program hopping infinity sign jumping kindergarten kinetic input laterality Lazy 8 letter recognition letter reversals letter size letter writing letters Life Skills listening skills math midline milestone milestones money motor coordination skills muscle strengthening object manipulations obstacle course origami parent engagement parent involvement parenting pencil grasp pencil grip phonics play play dough positioning pre-k pre-writing pre-writing skills quad position Sand scissors use Self-care activity sensory activity sensory input shapes shoelaces short term memory sight words simple step directions social skills sorting spacing speech spelling spelling words standing balance stuttering tactile cues task attention therapy ball therapy putty Therapy session unstructured play using a ruler visual attention visual cues visual discrimination visual field integration visual learner visual motor coordination visual motor skills visual perceptual skills visual sequential skills visual skills visual spacial skills visual tracking skills worksheets writing alignment writing name
Showing posts with label fine motor skills. Show all posts

Wednesday, May 6, 2015

Mother's Day Card

Mother's Day is right around the corner. So the theme of this week is Celebrating Mother's Day.  We talk about Mother's Day, date (orientation to time), why we celebrate Mother's Day, and what we can say to mommy.  Then we make our special-special Mother's Day card. This is how we make the card.

First, fold a paper in half (white side out). Then trace the child's hand. Make sure child's thumb and index finger are directed towards the folding edge of the paper. So when you unfold the paper after cutting, you have two identical hands on the entire paper.

Try to make the half heart shape with the thumb and index finger on the paper.

Cut the shape of the hands.  Try not to cut the index finger and the thumb on the folding edge. Try not to cut off your fingers on the paper.

Unfold the paper and paste it on a contraction paper. Make sure your have a heart shape in the middle. You can glue another color paper for the heart shape and make it stands out.

Then you can decorate the card. You can write sweet messages to mommy. You can draw some flowers and hearts on it.  You can also use different materials for decorations such as pom-poms, pre-cut forms, and so on.

We used some scrapbook materials for this.

Have fun~! Happy Mother's Day~!!

Wednesday, April 15, 2015

Make a pattern

Do you want to find out whether your child is a visual learner or an auditory learner?  Try this!

I have this box of cubes that was donated by a teacher in my school.  You can use these cubes in  many different ways.  If you have Lego blocks, you can use them too.

First, I tell the kids to make a pattern of the cubes without showing them the actual color pattern, only by listening to the directions.  Then I just wait and see if they can make it without extra verbal cues. 
Second, I show them a pattern of cubes and ask kids to make the same pattern without looking at the sample.  I hide my sample pattern while they're trying to make it.  See if the kids can remember and replicate what they saw before.


Do you want to challenge them? Make the pattern a little harder by giving them more colors.  For children who are visual learners, I would like to suggest playing the game focusing on auditory comprehension and memory, and the other way around.  Hence, children can strengthen their weakness by playing and having fun.

Enjoy playing!  

Sunday, March 29, 2015

Snip! Snip!

When would be the good time to introduce scissors to kids? Experts say "kids can cut well with scissors at the age of 5 to 6."  It means kids typically are ready physically on their little hands for scissors use at that age.  However, if kids are not exposed to using scissors often, using scissors can be a tricky task for them.    

Before you give any scissors to your children, I would like to suggest that you think of your child's hand dominance, size of his/her hands, size of the scissors, and how well the scissors cut.  

I would like to introduce some activities that can help kids to learn scissors use.  Most activities focus on using the thumb, index finger, and middle finger separately from the ring finger and pinkie.

  • Picking up small things such as pom-pom's, buttons, and uncooked macaroni pasta with a tong with those three fingers (the thumb, index, and middle finger) 
  • Spinning a top
  • Playing with finger puppets
  • Popping a bubble sheet with those three fingers (the thumb, index, and middle finger), No pounding on the bubble sheet with the fist

This is another way of teaching kids how to use the scissors.  After I tell or show my kids how to use the scissors, I sometimes video-tape their hands right away.  Then I share the video clip with them.  First of all, they're interested in using high-tech gadgets during session.  They like to see themselves in the video clip or in the picture. Seeing themselves in the video clip or pictures becomes reinforcement and visual cues for next time learning.  And it works!!


These are my kindergarten kids and they practice snipping the scissors.  They play cutting the putty.
Student A stretches the putty.  Student B cuts the putty.  Student A adds those two cut pieces of the putty and stretches it again and again.  Student B continues cutting the putty.  After 10 times of cutting, they switch their jobs.


Are you ready to have fun?! 
Enjoy teaching and Enjoy learning~!


Wednesday, March 11, 2015

Origami: Folding paper

Have you ever tried to follow origami diagrams and instructions? Folding paper inside or outside, or bringing a flap up or down... It doesn't sound so easy, right? Origami requires kids to use their visual skills as well as fine motor skills.
I like origami because kids love the activity. Also, kids can take the origami project home at the end of the session. Kids tend to show better and longer attention span while they participate in the activity.

Here I would like to share ideas of making the activity little easier for kids.

1. You can choose an easy or relatively difficult origami project depending on your child's level of skills and his/her age.
Some projects involve many steps of folding paper and theses are relatively harder than the others.

2. You can give your child extra visual cues by demonstrating first. You show your child how to fold it first.
See if your child follow through.
If he/she follows your instructions and demonstration, that's great!! If not, here are more tips!

3. Give more visual cues on the paper. Draw a line for folding. "This yellow line is where you will fold the paper." "Make the corners pointy."

You can use shapes. "Have the shapes kiss! kiss!" "Have the shapes meet together."
(I stamped dots here. You can simply draw different shapes such as a square, circle, star, diamond, etc. It is a good chance to teach younger kids different shapes.)

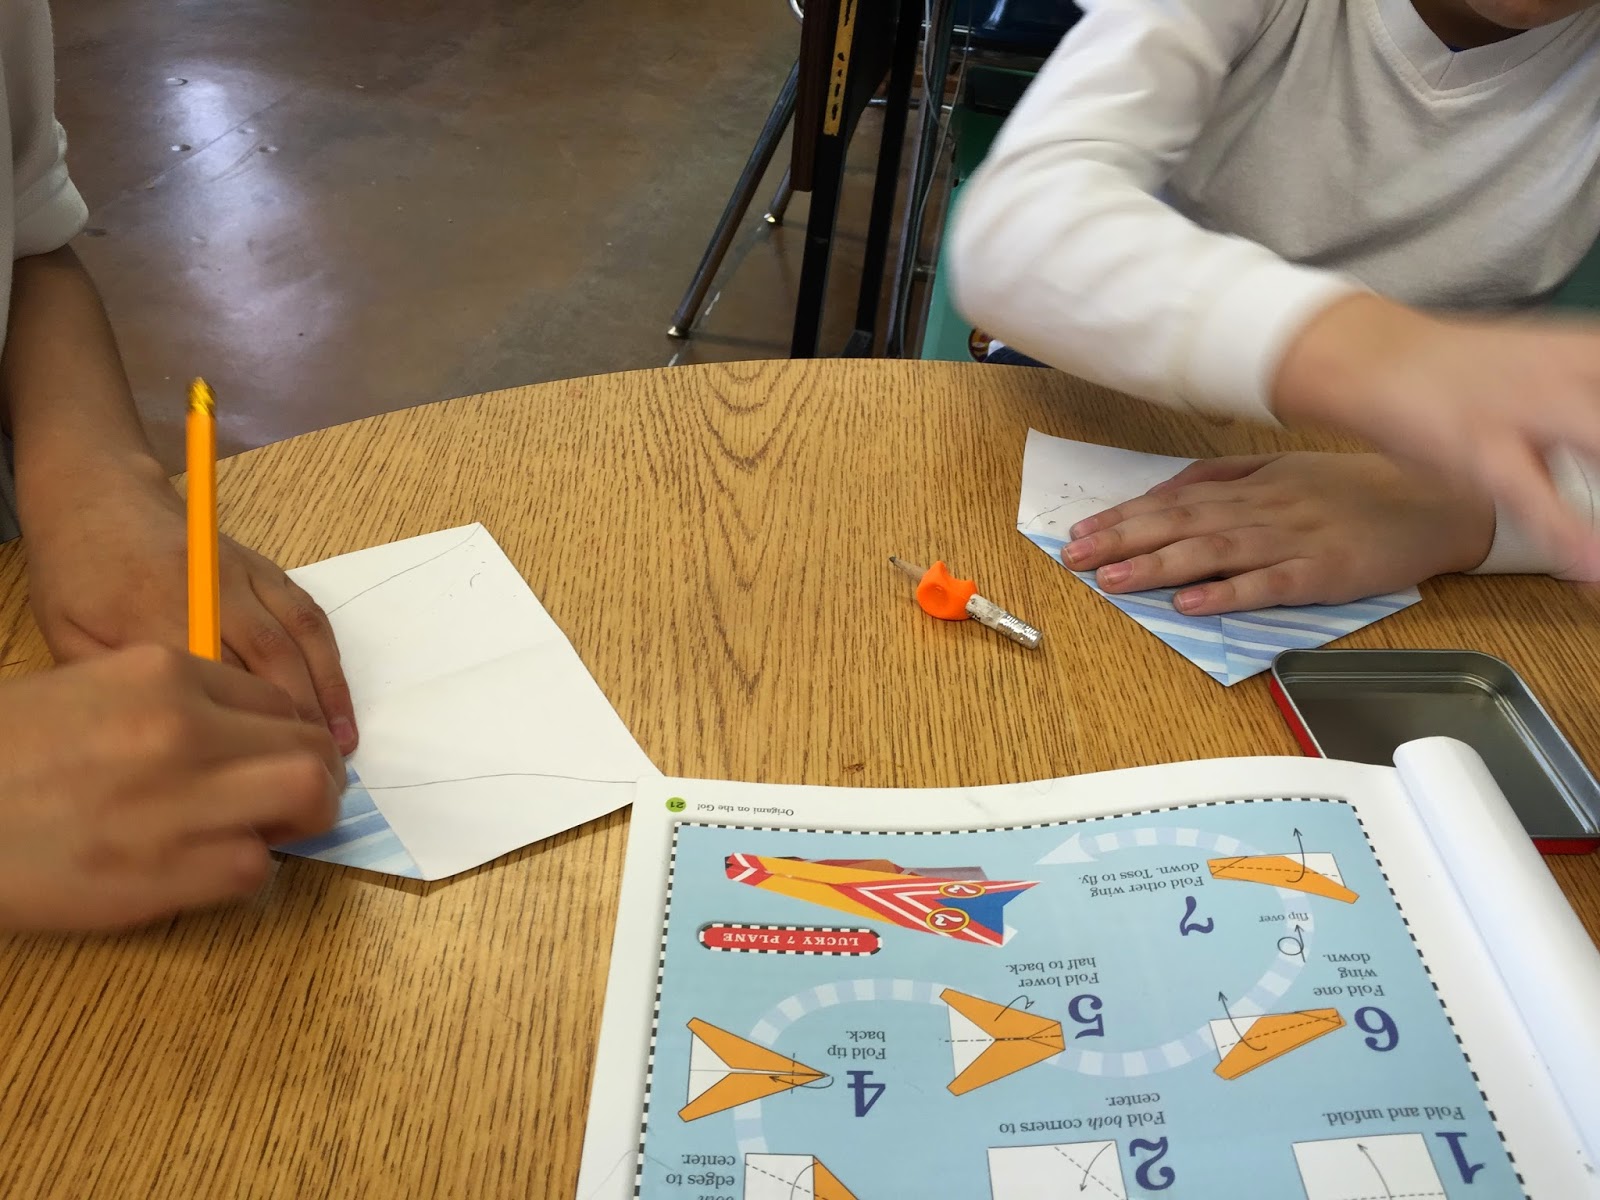
4. These are my second graders. They are trying to draw lines on the paper to understand where they should fold on the paper.
I didn't give them a ruler to draw a straight line.  I wanted them to understand the concept of folding paper from the 'point A' to 'point B'.  You can surely give your child a ruler and see how he/she uses the ruler.  Just remember, using a ruler requires fine motor skills on both hands.  One hand is pressing down on the ruler.  The other hand is drawing a line.  Doing different task on each hand may be not too easy for some kids.

5. Last but not least, I would like to suggest adults giving least amount of assistance to kids in the beginning. Just wait and see how kids are handling difficulty. "Do they try to solve the problem by themselves?" "Do they give up easily?" "Do they ask for help after a few times of trying it?"
You want to learn how your child tries to solve problems and how much assistance she/he needs to do things.

Enjoy learning and teaching~!!

More resources on http://www.origami-instructions.com

Thursday, March 5, 2015

Play-doh time!

Kids love to play with play-doh. I do like to play with play-doh but not as much as they do. :) We can do so many different activities with play-doh.  And you don't need to buy it from a store.  You can simply make the dough with flour, water, and some food coloring (optional). Have your child make some dough today! WARNING: It can be messy!  

This is one of my kindergarden kids.  Here I would like to share two play-doh activities.
Before we move on, I would like to point out that her pencil grasp is improving. One more thing! She doesn't enjoy writing much but will enjoy making letters with the play-doh.

Activity 1: Letter Dots

Play with the play-doh. You can smoosh it, stretch it, squash it, knead it, and make it flat on the table with your hands and fingers. (FYI, if you give your child the big piece of the play-doh, his/her hands and fingers work more than working on the small piece.)

If it is flat enough, let's make a letter.  Use the eraser-top side and make the letter, ___.

Reinforce the proper letter formation and to start from the top as if writing on a piece of the paper.  

Let's do it again. Smoosh it. Make it flat. Then make another letter.

Let's twist it! You can write a letter and ask your child what letter it is.

Activity 2: Make a letter.

Simply knead the play-doh and make it like a snake. Then make letters.  
Kids sometimes have difficulty with pressing down on the dough and kneading.  You may want to teach how to knead the dough by pressing down his/her hand gently and moving your hands together (hand-over-hand guidance).  Or on the other hand, you can ask her/him to press on your hand while you're kneading the dough.    
Show how to make the letter. After making the letter, you can ask your child to trace the letter with the index finger on her/his writing hand to encourage appropriate handwriting skills.

More importantly! Have fun with playing the play-doh!!

Check this out!!  How to Make Playdough


Fun Learning~Fun Teaching~!

Tuesday, February 24, 2015

Do you need a pencil grip? Why?

Do you know what is a pencil grip? Not the way of you holding the pencil but the tools that actually help you to hold the pencil properly...

You would probably think 'why do you need a tool to hold a pencil?'

As younger kids (I would say pre-k or earlier) are demanded to write at such a young age, they obviously start writing with their immature hands.  Or on the other hand, kids never experienced proper writing or holding a pencil before schooling, then they will have difficulty writing and/or holding pencil when they start school.

I'm not saying all kids are not ready for writing at this age.  I am trying to say that their tiny hands are still developing.  And some kids can struggle with holding the pencil and/or writing, which is "normal".

I have a three-year-old boy at home who goes to a nursery school while I am working with other kids in school.  He recently started tracing letters at the school.  I have noticed that he tries to hold the pencil in different ways.  It seems that he did not figure out the proper way or the most comfortable way of holding the pencil yet.  We will see.

This is what I think...(when I think of typically developing kids or kids with mild development delays)
Pencil grips are surely helpful.  But not all the pencil grips are good for my child.  Before you try to give any pencil grip to your child, try to teach your child the proper way of holding the pencil verbally and with your demonstration.  Give some time to your child and see if she/he tries to follow directions.  You can let your child struggle a little bit (with your supervision).  You know struggling is a learning process.  Kids may like to use a pencil grip because it looks cool.  Long term goal will be writing without a tool.  One more thing! Before you give a pencil grip to your child, try to use it and see what it does and how you feel on your hand.  Think of the size difference between your hand and child's hand.  Then start the process.  Don't forget to observe how your child using it.  FYI, I like to use a pencil grip sometimes.  It just feels different!  I believe the most important thing is that we make the writing the fun, enjoyable, and exciting activity for kids.  If the pencil grips are the tools to make the writing cool experience, WHY NOT!