Labels

ADLs all four position alphabet letters alphabet writing arts & crafts Attention auditory learner auditory processing beads bilateral motor coordination skills blocks brain bunny story categorization cognitive skills color color dots coloring colors crossing a midline cutting CVC words deep breathing directionality disclaimer dynamic communication Expectations eye-hand coordination Figure 8 fine motor activity fine motor skills first grade folding paper following directions fun Fun game gross motor activity handwriting Handwriting Without Tears hemispheres communicate Home Exercises Program hopping infinity sign jumping kindergarten kinetic input laterality Lazy 8 letter recognition letter reversals letter size letter writing letters Life Skills listening skills math midline milestone milestones money motor coordination skills muscle strengthening object manipulations obstacle course origami parent engagement parent involvement parenting pencil grasp pencil grip phonics play play dough positioning pre-k pre-writing pre-writing skills quad position Sand scissors use Self-care activity sensory activity sensory input shapes shoelaces short term memory sight words simple step directions social skills sorting spacing speech spelling spelling words standing balance stuttering tactile cues task attention therapy ball therapy putty Therapy session unstructured play using a ruler visual attention visual cues visual discrimination visual field integration visual learner visual motor coordination visual motor skills visual perceptual skills visual sequential skills visual skills visual spacial skills visual tracking skills worksheets writing alignment writing name

Tuesday, March 31, 2015

Walking on the maze

This is one of the frequently used therapy activities.  You can simply make a track with masking tapes.  When you make the track, try to make some left and right turnings.  You can do many things with this maze.  

(I wouldn't use the duck tapes because it is not easy to take off the duck tapes after use.  It sometimes leave the sticky residue on the floor.)   


In this picture, my first grader is trying to kick the cone right along the line.  In the next picture, the same student tries to dribble the ball along the track.

Obviously the cone does not roll away from him and he shows better control on the cone.  However, it is not the same experience with the rolling ball. He has to do the little kicks and stops the ball continuously.
This activity enhances visual motor skills, visual attention skills, and motor coordination skills.  And kids surely have fun.  Regardless of their difficulties or conditions, kids love challenges and play time.
These are my second graders.  One student is walking on the track with the blindfold and another student tries to give directions to the student. This is a great activity to learn directionality, left and right side. The one who gives directions also has to know the directions in mirror image.  

This activity can enhance their laterality (knowing left and right side in his body), directionality (telling left and right side in space), listening and following directions.    

Are you thinking of the size of your apartment? Yes, my apartment is also very tight and I totally understand this activity is not feasible at home. You can draw the track with the outdoor chalks in the park. You can make a big and long track with your child. There should be no excuses when the weather gets warmer.  Have fun!! 

Sunday, March 29, 2015

Snip! Snip!

When would be the good time to introduce scissors to kids? Experts say "kids can cut well with scissors at the age of 5 to 6."  It means kids typically are ready physically on their little hands for scissors use at that age.  However, if kids are not exposed to using scissors often, using scissors can be a tricky task for them.    

Before you give any scissors to your children, I would like to suggest that you think of your child's hand dominance, size of his/her hands, size of the scissors, and how well the scissors cut.  

I would like to introduce some activities that can help kids to learn scissors use.  Most activities focus on using the thumb, index finger, and middle finger separately from the ring finger and pinkie.

  • Picking up small things such as pom-pom's, buttons, and uncooked macaroni pasta with a tong with those three fingers (the thumb, index, and middle finger) 
  • Spinning a top
  • Playing with finger puppets
  • Popping a bubble sheet with those three fingers (the thumb, index, and middle finger), No pounding on the bubble sheet with the fist

This is another way of teaching kids how to use the scissors.  After I tell or show my kids how to use the scissors, I sometimes video-tape their hands right away.  Then I share the video clip with them.  First of all, they're interested in using high-tech gadgets during session.  They like to see themselves in the video clip or in the picture. Seeing themselves in the video clip or pictures becomes reinforcement and visual cues for next time learning.  And it works!!


These are my kindergarten kids and they practice snipping the scissors.  They play cutting the putty.
Student A stretches the putty.  Student B cuts the putty.  Student A adds those two cut pieces of the putty and stretches it again and again.  Student B continues cutting the putty.  After 10 times of cutting, they switch their jobs.


Are you ready to have fun?! 
Enjoy teaching and Enjoy learning~!


Thursday, March 26, 2015

Alphabet Plate

This is the alphabet plate which my OT friend introduced to me. And I like it as much as my kids do.

You can simply write down letters randomly on a paper plate and need a penny.

 
These are my kindergarten kids and they're trying to maneuver the dish, side to side and up and down, to move the penny from A to Z.  Find alphabet letters in order.


Then they spell sight words on the plate.  They put their index finger on the penny and move around on the plate.

Remember. This activity looks simple but kids may show some difficulty. I would like to suggest parents to try it first and feel how it is easy or difficult.

Enjoy playing~!


Tuesday, March 24, 2015

Let Them Be Messy!

Over the last weekend, my son asked me to set up the coloring activity for him and his little sister.  My son is almost 4 years old.  My little girl is turning 2 in June.  Their age tells you a lot, right?  Then, I said "OMG" in my mind.  Without seeing it, I could tell that they would definitely get messy.  It means I have to do the cleaning more than I usually do.  Oh~well...

Here he is.  He did some abstract drawing first. Then he mixed those colors with his hands and feet and stamped them on the paper.  After that, he walked around the living room without wiping the colors on his feet. How worse could it be?!! By this time, I just sit back and watched him enjoying the activity.  I also took these pictures. :)  
He picked up the heart shape sponge and started to stamp it on his feet. He said "Mommy, Mommy, look!" "It's a heart shape." "I'm giving love to my feet!"
He picked up a paint brush and drew the letter "X" on his hand. Then he said, "Mommy, Mommy, Look! Letter X"

He enjoyed drawing, coloring, telling shapes, and writing letters, mixing colors, and getting messy all over the living room.  He also helped me cleaning the living room after he was done.  


This is not the way that I would play with my kids during my session in school.  But it doesn't mean that they cannot play like this.  In fact, I strongly suggest this type of unstructured activities for home.  Don't worry about cleaning. Think about having fun with your child and watching him/her enjoying the activity. 

*If you decide to do this messy activity, it's better to do it right before the bath time.  Let them be messy and then throw them into the bathtub.  

Enjoy time with your child!     

Sunday, March 22, 2015

Worksheets can be FUN!

Worksheets! Sounds boring? Not really!

I would like to introduce some fun worksheets.  A few weeks ago, one of my OT colleagues introduced this website, "Inner Pieces Gallery."  You can find many free printable worksheets and a list of suggested children's books.  

Before my kids begin a worksheet, we read the instructions together. Then I ask them to do it without further explanation.  If they follow through the instructions without difficulty, that's great!  If not, here is how I break it down to make things a little easier.  

The following worksheet is one of the visual tracking activities.  You have to circle the round shape smiley faces on each line without picking up your pencil in the middle.  This can be a pre-writing activity as well.  

Here I make a dot in the beginning of each line to tell my kids where they should start and demonstrate how they should follow through without lifting their pencil.

Then kids will try to draw circles around the round shape smiley faces on each line.
This step is not part of the worksheet but I add in to it just to challenge their visual skills and task attention.

I ask kids to stamp the dot on the empty circle on each line.
They will count the round shape smiley faces that they circled on each line.  They have to remember that they do not count the colored ones.     

The second part of this activity sheet is solving a puzzle.  The number from each line has a corresponding letter.  So kids will find out a phrase by solving the puzzle.  


Go on the "Inner Pieces Gallery" and sign up to get free printable worksheets.  The worksheets on the Inner Pieces Gallery are FUN!!

Are you ready to have fun with your kid? Enjoy~! 

Thursday, March 19, 2015

Arts & Crafts: Making a name tag.

What do you think the most frequently asked questions by kids? "What are we doing today?" "What are we making today?" "What's next?"

Of course, I don't have answers to all the questions. I know they are expecting something cool, nice, fun, and exciting. I also know whatever I give them will not be enough for entertaining them. Then I ask ('It's my turn to ask a question!'), "what do you want to do today?" And they pause for a second. Yes, they're thinking. I love this "pause", thinking moment, and time for taking a breath. Sometimes they come up with an idea. Sometimes they need guidance and suggestions (not too many though). 

This is an Arts & Crafts activity that I do once a year with my kids. Let's make a name tag!  

Prep Materials: beads, a straw, a wired crafts stick, a clothes pin, and a paper with writing lines

How to Make:
First, write your name on the lined paper. Make sure write it neat. You can use different writing tools (i.e. markers, color pencils, crayons, etc) and make your name special and unique.

Practice writing and holding a writing tool efficiently. 
Second, put those beads through the wired stick. You can use different color beads or the same color beads. You can make your own patterns as well.  Be creative.
Third, tape the straw on the back of the name and put the wired stick through the straw. You only need a portion of the straw. Then continue to put those beads.

Make sure your name is not upside down. 

Fourth, leave about 1 1/2" wire at the end (without beads) and put the clothes pin through.  Twist the wire and close the ending.
Ta-Da~!! The name tag is done! Clip it on anywhere!

Don't forget to praise your child for good effort as well as the final project.

Kids love to take something that they made during my session.


Q: How can you make this activity easier for younger children?
A: You can use a thick wired crafts stick and bigger sized beads. You can also give them a few beads at a time rather than giving them a bucket of the beads. 
Q: How can you make this activity harder for older children or children with adequate fine motor skills? 
A: I guess you already found the answer by now. You can use a thin wired crafts stick or thin thread and smaller sized beads. You can also give them a bucket of the beads with mixed sized beads. 

*Please do not help your child too soon. Give some time to you and your child. You want to give you some time to learn about your child and how much your child can tolerate the frustration when he/she faces difficulty. You want to give some time to your child to solve the problem independently.
**You know about the CHOCKING HAZARD! Do not leave your child unattended while you do this activity with your child, specially the younger ones.

Enjoy time with your kids~!

Tuesday, March 17, 2015

Squeeze and Hop

This is one of my first graders.  She has weak thigh muscles, specifically adductors (inner thigh muscles; pulling legs to midline) and flexors (front thigh muscles; bending hip joints for knees-up). It means that bringing her knees up in a straight line in front of her is not so easy.  


How does it affect her school function?
She shows difficulty with bringing her knees up in the midline when she goes up the stairs.  Her knees tend to open and turn away from the midline.  She is prone to falls and obtains close supervision at all time in school.

This simple activity will strengthen her leg muscles. Nowadays, kids spend much time in sitting. Don't they love to play video game at home? Let's blame the snowy winter. But spring is right around the corner. Let's get ready to have some fun outside.

Instructions of this game:
Squeeze the ball in between your feet and hop on the dots! Make sure you carry the ball all the way!

How can this game be modified?
Do you want to make it more difficult?  You can post a letter or word on each dot and have your child say it as he/she hops on the dots. Or you can place the dots farther from each other, so your child really have to jump. Do you want to make it easier? Having less numbers of the dots will be easier. Have your child hold the ball in between his/her knees or thighs. Using a big muscle group to hold the ball will be easier than holding it in between the feet.  

Have fun hopping and jumping~!  

Saturday, March 14, 2015

Blow it! Spell it!

"Blow it! Spell it!" This activity is similar to the activity that I shared on the previous blog, Enjoy Learning: Spelling Words on 02/27/15.

Prep Materials: Letter paper, straw, and a small piece of crumpled tissue paper

How to prepare the materials:
  • You randomly write down alphabet letters on a piece of paper, preferably bigger than 8x10 notebook size. You can also have your child write down letters.
  • Have your child crumple up the piece of tissue paper. (I colored the tissue paper with a marker just to make it noticeable on the white background paper.)

After the materials are prepared, kids will blow the crumpled tissue paper with the straw from one letter to the next.  You can practice spelling sight words or everyday words with your child.  


What are the benefits of this activity?

As mentioned in the previous blog, this activity helps with kids' visual skills such as visual attention and visual motor skills by tracking and scanning the letters.  

It helps with short term and long term memory performance by reviewing and spelling words.  Let's help them to be a better speller.  Start asking kids to spell easy words to boost their confidence. Don't forget to challenge them as well.   

Blowing through a straw is an oral-motor activity that can help kids with speech development.  

One more thing~!! Importance of breathing...
Deep and slow breathing helps kids to be calm down when they are highly active or feel anxious.  Kids are encouraged to learn deep and slow breathing while performing this activity. 

This activity can be slightly far from being sanitary.  You will see what I mean when you play with your child.  Get ready to make the paper wet! haha~~ :)  

Enjoy Learning, Enjoy Teaching~!


Wednesday, March 11, 2015

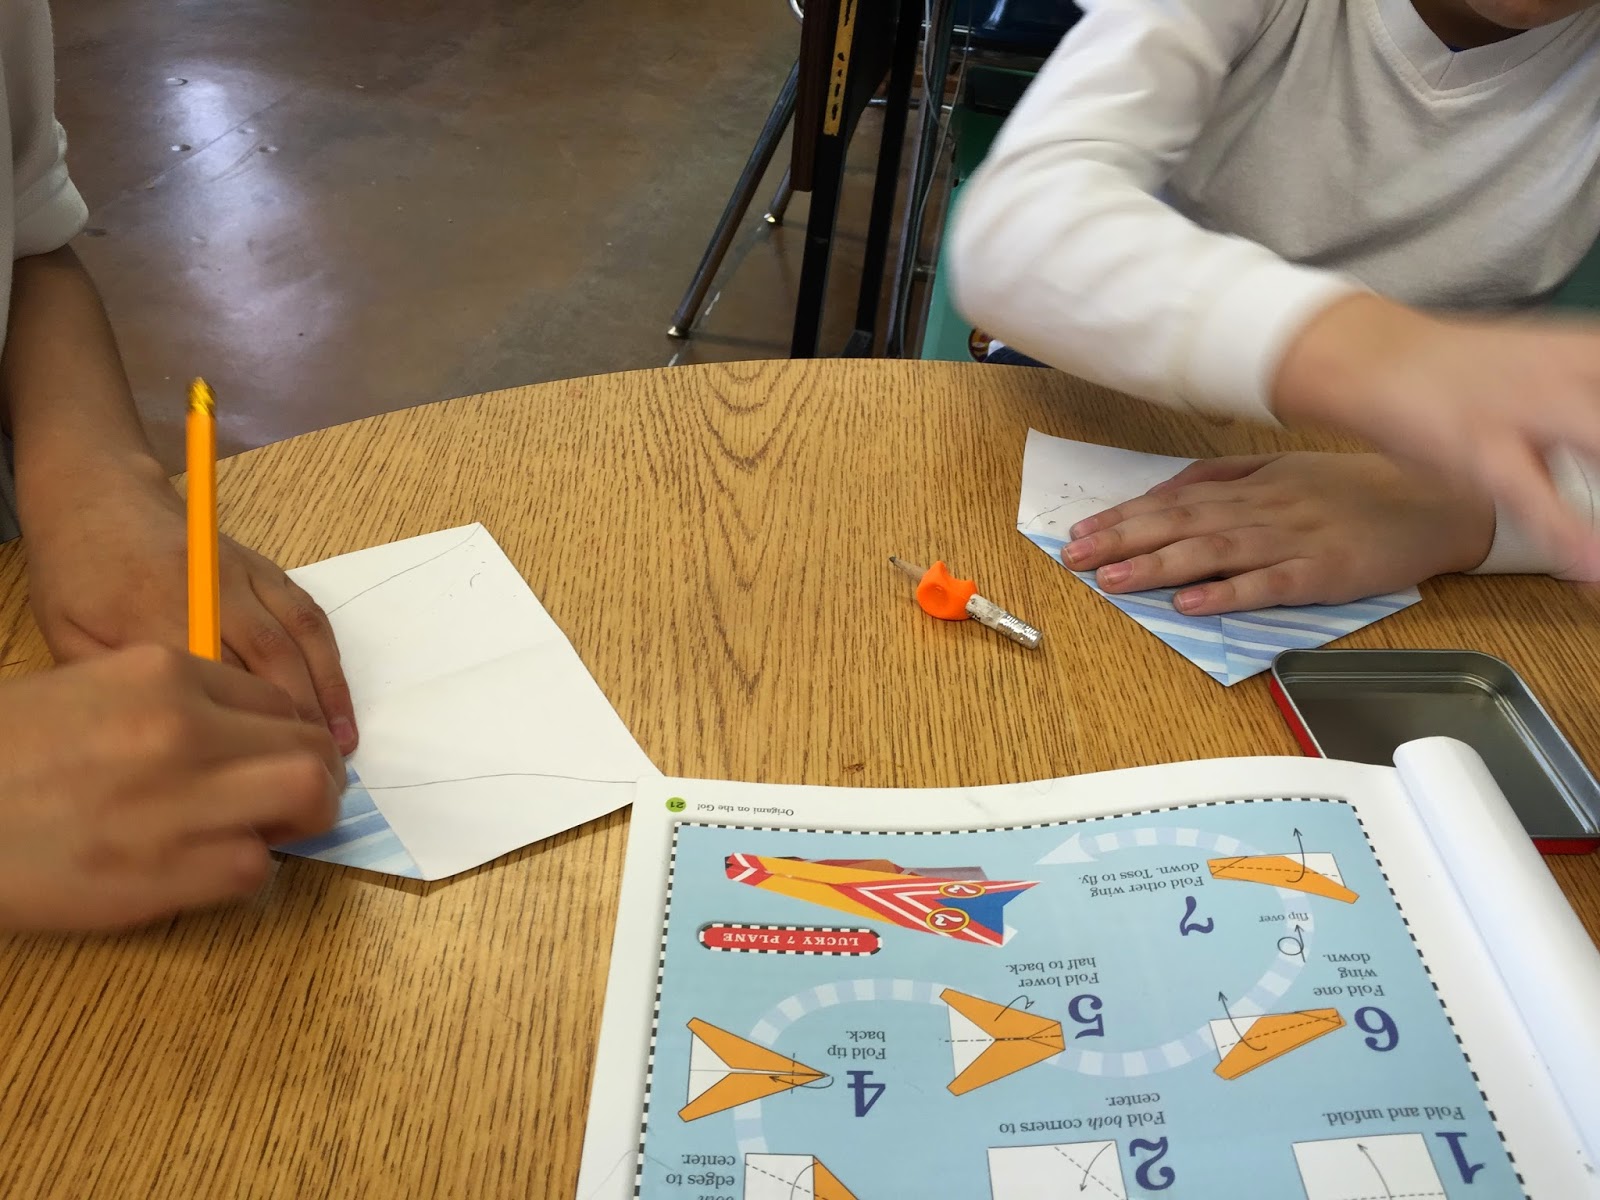
Origami: Folding paper

Have you ever tried to follow origami diagrams and instructions? Folding paper inside or outside, or bringing a flap up or down... It doesn't sound so easy, right? Origami requires kids to use their visual skills as well as fine motor skills.
I like origami because kids love the activity. Also, kids can take the origami project home at the end of the session. Kids tend to show better and longer attention span while they participate in the activity.

Here I would like to share ideas of making the activity little easier for kids.

1. You can choose an easy or relatively difficult origami project depending on your child's level of skills and his/her age.
Some projects involve many steps of folding paper and theses are relatively harder than the others.

2. You can give your child extra visual cues by demonstrating first. You show your child how to fold it first.
See if your child follow through.
If he/she follows your instructions and demonstration, that's great!! If not, here are more tips!

3. Give more visual cues on the paper. Draw a line for folding. "This yellow line is where you will fold the paper." "Make the corners pointy."

You can use shapes. "Have the shapes kiss! kiss!" "Have the shapes meet together."
(I stamped dots here. You can simply draw different shapes such as a square, circle, star, diamond, etc. It is a good chance to teach younger kids different shapes.)

4. These are my second graders. They are trying to draw lines on the paper to understand where they should fold on the paper.
I didn't give them a ruler to draw a straight line.  I wanted them to understand the concept of folding paper from the 'point A' to 'point B'.  You can surely give your child a ruler and see how he/she uses the ruler.  Just remember, using a ruler requires fine motor skills on both hands.  One hand is pressing down on the ruler.  The other hand is drawing a line.  Doing different task on each hand may be not too easy for some kids.

5. Last but not least, I would like to suggest adults giving least amount of assistance to kids in the beginning. Just wait and see how kids are handling difficulty. "Do they try to solve the problem by themselves?" "Do they give up easily?" "Do they ask for help after a few times of trying it?"
You want to learn how your child tries to solve problems and how much assistance she/he needs to do things.

Enjoy learning and teaching~!!

More resources on http://www.origami-instructions.com

Monday, March 9, 2015

Matching Colors

This is another exercise that can help kids'  visual skills.

What you need:
Color chart (Use different color dots in random orders; Do not make any patterns of the colors; More dots and small dots will be harder and more strenuous to the eyes.)  
Color Markers that can match the color dots on the chart.

How to play: (I will call them Student A and B.)
Student A, who is sitting on the therapy ball, holds two different color markers on his hands, one on each hand.
Then he will simply match and touch his markers on the dots in the chart from top to bottom and line by line.  He cannot skip any lines or colors that he has in his hands.
Student B, who is standing behind, is an observer.  He is also visually following how Student A performs this activity.  When Student A makes a mistake, Student B shouts "STOP".  Then Student A has to start from the beginning.

I believe this is a pretty simple activity to make with your child at home.  Try it and see how it is different than you think it is.

Why is the student sitting on the therapy ball?    
First of all, most of my kids like to sit on the ball.  It's bouncy and fun!! If they ask me, "Ms. Su, can I sit on the ball?" My answer is usually "Yes".
The therapy ball gives different feelings to their body.  It also helps with their trunk posture and control.  It can help with their task attention as well.

If your child has difficulty with completing homework at home due to his/her decreased attention span, try to use the exercise ball or air cushion.  Hopefully, it works for your child.  

This is a research article about Therapy ball use.

Enjoy Learning~ Enjoy Teaching~!

Sunday, March 8, 2015

Letter Reversals

Are you concerned about your child's writing letters or numbers in reversed direction? Letter b and d, letter q and p, the directions of the letter z and s, or writing "der" instead of "red", etc...
Experts say children frequently have letter reversals when they first learn to write due to their immature brain. Therefore, it is not uncommon to see children up to 7 years old making letter reversals.  Are you still worried?

I would like to share one activity that can enhance differentiating the letters, listening and visual skills.

First, I will have my kids dictate random letters such as d, b, p, and q that they get often confused. I will call out those letters but will not make patterns of the letters.  You can start with only two letters (i.e. 'd' and 'b').  Remember not to make patterns.

(Sample)
d  d  d  d  b  b  d  b  b  d  d  d  b  d  d  b  b  b  b  b  b  b  d  d  b  d  b  d  d  b  d  d  d  b  b  b  d  d  d  b  d  d  b  b  b  d  d  b  b  d  d  d  b  b  b  b  d  b  d  d


After they finish writing the strings of the letters, they will cross out one letter from the beginning.
(Sample Instruction: "Cross out all the letter 'b' from the beginning.")

This activity will help kids to differentiate the letters by repetitive writing and canceling.  It will also enhance their listening skills by dictation of the letters.  Last, they will improve visual skills by letter cancellation.

Don't forget to give your child a prize for his/her good effort, not only for the result.

Please do some reading on Letter Reversals by the Public Schools of North Carolina, Department of Public Institution (DPI).  You will find out many suggestions on the website.


Enjoy working with you child~!

Friday, March 6, 2015

Toss the balloon! Did you see the letter?

I think this is the first gross motor activity that I post on my blog.
These are my second graders.  In this picture, two of them are participating in OT session and other two are attending PT session. Competition! Competition!!
OT vs. PT students! :)
Competition is sometimes a good motivator for kids.  I would not make them compete each other 1:1.   I like group competition. I want them to support each other when they did not win the game.  It encourages their social skills while they're playing.

So this is the game rule:
2 kids plays in one team.
They will toss a ballon.  The balloon has a letter attached by the Velcro. (You can tape the letter or write down multiple letters on the balloon.)
Each team tosses the balloon to each other.  When it's fell down on the floor, the other team gets a chance to answer what letter it is.
If the team answers correctly, they'll get a point.  If not, the other team will get a chance to answer.

Why are they playing this game?

This game enhances kids' visual skills and visual motor coordination skills.  In order to play this game, they have to look at the balloon and should track the balloon to toss it back to the other team.
In addition, they have to pay attention to the letter that keeps moving. It is not easy to keep the balloon in the air and to keep their eyes on the moving balloon and the letter at the same time.

How does visual skills affect kids' school function ?

I guess this is a rhetorical question. In school, kids need visual skills for playing, participating in gym, looking at teachers during lesson, and copying assignments from the board, etc.  Enhance their visual skills by playing and having fun with them.  They will also improve classroom participation and function.  


Enjoy playing~!

Thursday, March 5, 2015

Play-doh time!

Kids love to play with play-doh. I do like to play with play-doh but not as much as they do. :) We can do so many different activities with play-doh.  And you don't need to buy it from a store.  You can simply make the dough with flour, water, and some food coloring (optional). Have your child make some dough today! WARNING: It can be messy!  

This is one of my kindergarden kids.  Here I would like to share two play-doh activities.
Before we move on, I would like to point out that her pencil grasp is improving. One more thing! She doesn't enjoy writing much but will enjoy making letters with the play-doh.

Activity 1: Letter Dots

Play with the play-doh. You can smoosh it, stretch it, squash it, knead it, and make it flat on the table with your hands and fingers. (FYI, if you give your child the big piece of the play-doh, his/her hands and fingers work more than working on the small piece.)

If it is flat enough, let's make a letter.  Use the eraser-top side and make the letter, ___.

Reinforce the proper letter formation and to start from the top as if writing on a piece of the paper.  

Let's do it again. Smoosh it. Make it flat. Then make another letter.

Let's twist it! You can write a letter and ask your child what letter it is.

Activity 2: Make a letter.

Simply knead the play-doh and make it like a snake. Then make letters.  
Kids sometimes have difficulty with pressing down on the dough and kneading.  You may want to teach how to knead the dough by pressing down his/her hand gently and moving your hands together (hand-over-hand guidance).  Or on the other hand, you can ask her/him to press on your hand while you're kneading the dough.    
Show how to make the letter. After making the letter, you can ask your child to trace the letter with the index finger on her/his writing hand to encourage appropriate handwriting skills.

More importantly! Have fun with playing the play-doh!!

Check this out!!  How to Make Playdough


Fun Learning~Fun Teaching~!

Wednesday, March 4, 2015

My OT session...

OT...Over-Time? lol ^^ Well, blogging is my over-time session.  OT stands for Occupational Therapy.  What is Occupational Therapy?  Do some research on your own.  Here is the AOTA Homepage.  It's a boring topic to discuss on my blog.
So what do I do with my kids in school?  I currently work with kids from kindergarten to 5th grade in public school.  My job is to help them to improve their school related skills and to have fun with them at the same time.

In general, my sessions include three parts as follows:

  1. Starting with big movements
    • Kids usually start off with gross motor exercises (big movements) in each session, if they come to the therapy room.  Exercises can help kids to be more alert or calm before they perform therapeutic activities or classroom activities.  Big movements can also help with fine motor (small muscle group) skills.  
  2. Performing therapeutic Activity
    • After kids finish with warm-up exercises, they perform a therapeutic activity.  Depending on their needs and IEP (Individualized Education Program) goals, this activity can vary from handwriting activity, arts and crafts, puzzles, memory games, origami paper folding activity, math game, playing a ball, and fine motor strengthening activity.
  3. Free Activity or Prize
    • After performing a therapeutic activity, kids are encouraged to choose one activity as a reward for good participation in OT.  Kids sometimes choose iPad game or other games (i.e. ball games).  If time is limited, they are given a prize at the end of the session. 
This is my general outline to run my sessions. It doesn't work all the time. I would like to point out that every therapist has different approach to his/her kids, just like every kid is different. Therapists can have different frames of reference in their mind, which affect their approach, treatment goals and activities.  However, ultimately we, as pediatric therapists, love to work with kids and love to see them doing their best at the moment.     

Tuesday, March 3, 2015

Make your own shoe!

As mentioned in the previous blog, my kids learn tying shoelaces at the tabletop first.
I usually make a paper (cardboard) shoe and have my kids decorate their own shoe.  
"Let's become a shoe designer!" "Make your shoe unique and special." 
After they make a shoe, they practice tying shoelaces on their shoe.  Then they take it home.

Make a pattern. I need many of those for all of my kids.  You can have your child draw the pattern.  It does not have to be the shape that I show here.  You can be creative with the shapes of the shoe.

Cut the pattern.  Be careful with cutting if you're using the cardboard.  I wouldn't let my kids to cut the cardboard for safety.  Safety comes first all the time!!

Do they look like shoes yet? I usually don't make the difference between left or right side of the shoes.  But it doesn't mean that you can't do it.  You can do whatever you want to do with your own shoe.  You can draw your toes to make your chid learn the left and right side of his/her feet.

Make dots for shoelace.  I usually make six holes for 40" long shoelace.  If the shoelace is longer than 40", then you need to make more holes on the shoe. 

Puncture right on the dots.  You can use a pen or any sharpy object to make holes.  I wouldn't use the hole puncher.
I want to make the holes small, so they can trap the shoelace tight.


Does it look like a shoe now? Make your shoelace even on each side.  Now you can make a mark on each string for extra visual cues.  As I showed you in the previous blog (Tie you shoes: Break down into simple steps on 02/26/15), I make a dot on one string with a marker and put a piece of tape around on the other side.

This picture shows extra visual cues for making the first knot.  Make an "X" on the red x mark. Then pick up the bottom string and bring it in and out.  Follow the green arrow.  

Fun Learning and Fun Teaching~!